August 2023 OPNsense in Proxmox#
This page contains a journal I wrote while setting up OPNsense inside of Proxmox.
Choosing Routing Software#
August 14
I recently setup spiderverse (formerly parker) with Proxmox 8. This computer will live in my dorm room, and I want to have it be in control of being my router. I want to decide between OPNsense (gh), pfSense (gh), and OpenWrt (gh). OK, I think I’ll go ahead and rule out OpenWrt, as I want something more powerful.
With a little bit of research, I see that OPNsense and pfSense are fairly similar, but pfSense is more popular and has been around longer. I get the feeling that OPNsense is a little more “cool”, and possibly slightly easier to configure and understand. Overall, this tutorial: https://teklager.se/en/pfsense-vs-opnsense/ has convinced me that OPNsense is the way to go.
Creating an OPNsense VM#
I’m following https://homenetworkguy.com/how-to/run-opnsense-in-proxmox-vm/.
I first need to download am image from https://opnsense.org/download/.
I grab the DVD ISO image and upload it to spiderverse’s ISO images inside its local storage.
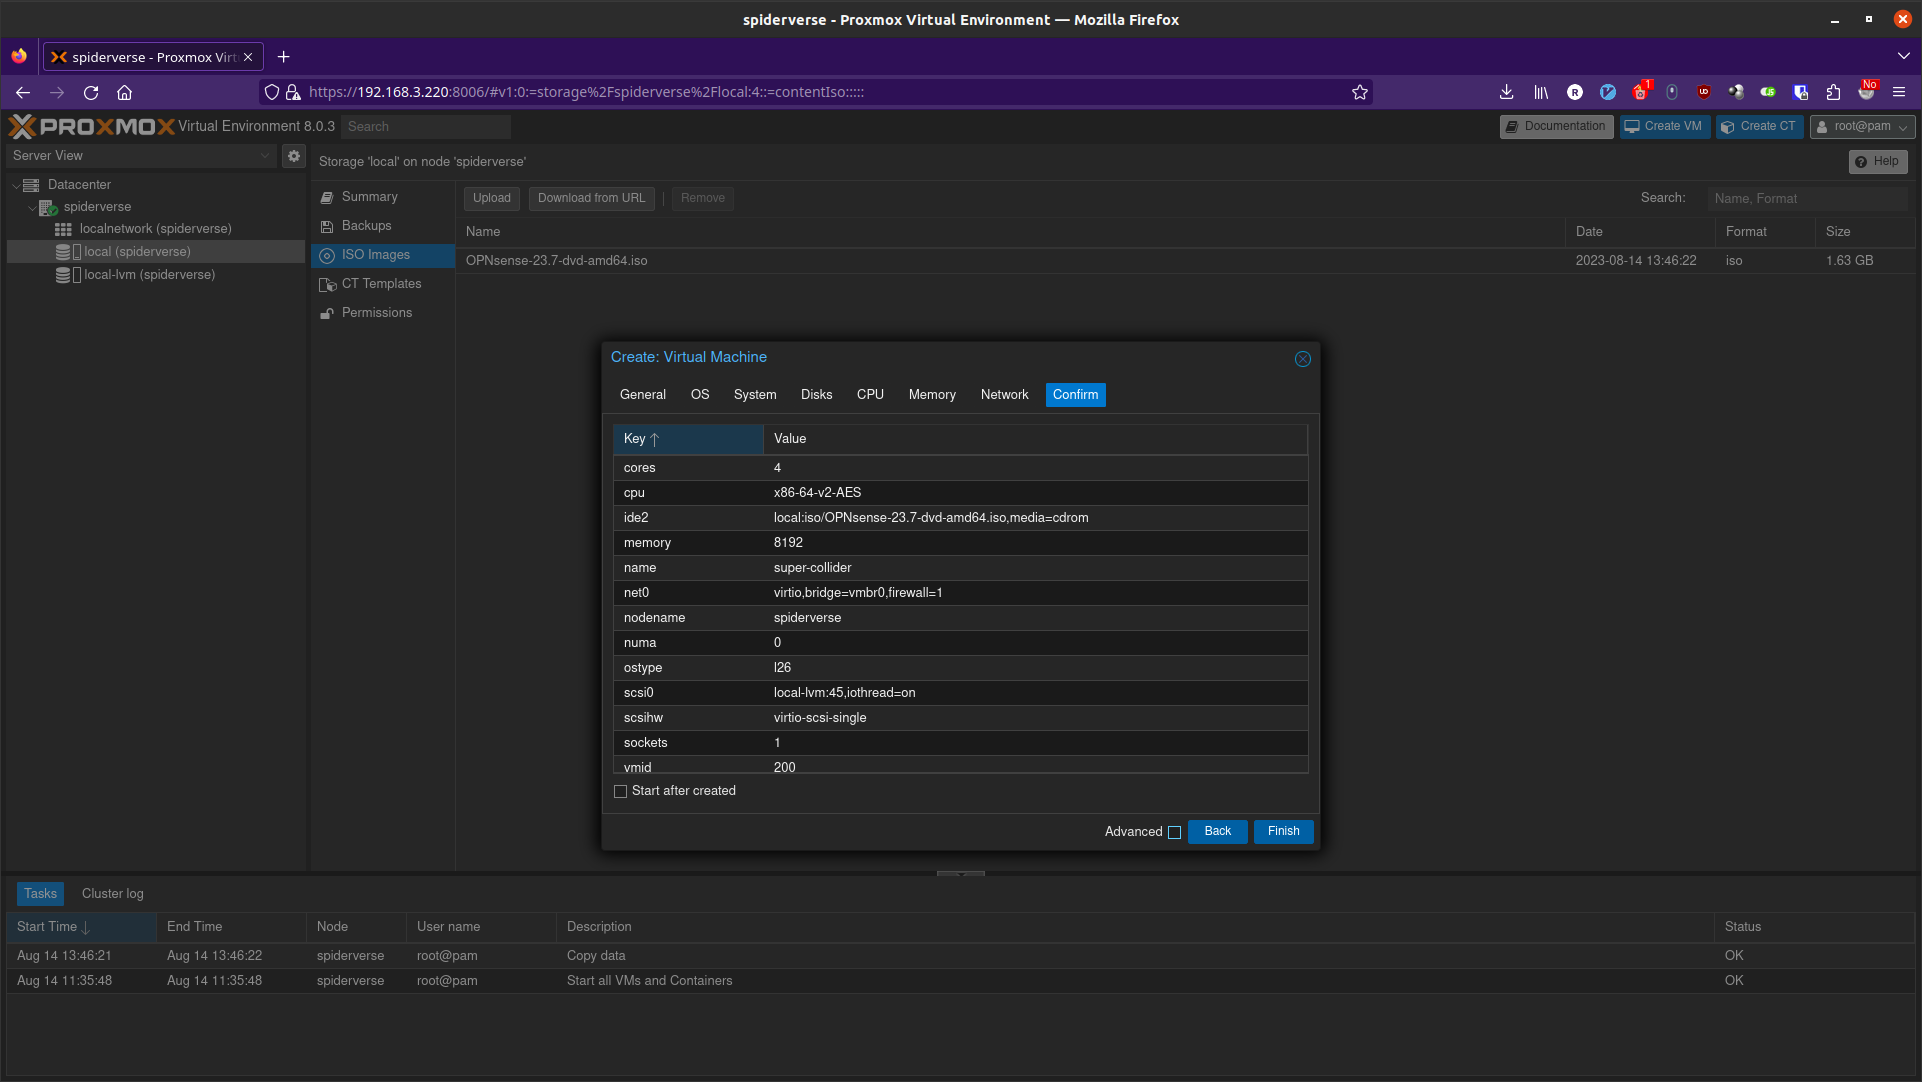
Now that I have the OPNsense-23.7-dvd-amd64.iso uploaded, it’s time to create a VM!
I will name this super-collider and give it an ID of 200, as I want to reserve the 1XX IDs for the existing containers/VMs on bigger-fish.
I chose what the tutorial recommends and give it all 4 cores of my machine (lscpu | grep -E '^Thread|^Core|^Socket|^CPU\(').
8GB of RAM should be good.
For networks I’ll leave it as the default bridge for now, but I will have to come back and add more networks.
The tutorial recommends I create a bridge for each physical port.
This means that I get to leave the network I’m currently configuring un-altered, as it will be the bridge for the port that I’m designating as my WAN port.
I’ll go ahead and create some network bridges following the naming conventions listed on Network Configuration.
vmbr1 gets enp2s0f0 as its only bridge port, and vmbr2 gets enp2s0f1 as its only bridge port.
I add them in the Hardware tab of my VM, and once I’m done I have a total of 3 network devices added.
Now I can start the VM!
Note
Remember to make the VM start on boot
Configuring OPNsense#
I booted into the installer and skipped the manual assignment and let it auto assign stuff.
Hopefully that’s OK. I’ll just assume it’s fine for now and continue on by logging in with installer/opnsense.
The OPNsense Installer docs say ZFS is usually the best option, so I will choose that.
It gives me the option of a RAID, but I won’t do that here. If I really wanted to have a RAID setup, I would have configured by local-lvm to be backed by a RAID.
I choose the stripe option. I choose the option to reboot.
Now I stop the VM before it boots into the installation again. I remove the install media by editing the CD/DVD Drive.
Now I start it again.
I take a look at the output of ifconfig and notice that vtnet0 is my LAN for OPNsense,
which happens to be using the vmbr0. I definitely need to change that to be my WAN, as that’s the Ethernet port that is being used to connect this to my network!
Remember, I don’t want this to be a router for my current network. I just want to configure it as a router while it’s on this network.
Now I go into the 1) Assign interfaces option, and it asks me questions that are shown in the tutorial.
I’ll make vtnet0 the WAN for now, as I do want the Ethernet port its connected to now to be the WAN port.
Now I have this:
WAN -> vtnet0
LAN -> vtnet1
OPT1 -> vtnet2
After confirming the WAN correctly shows 192.168.3.109/24.
My router sees that IP address as being my OPNsense host, which is good.
I am able to use option 7) Ping host to ping my phone, so that’s good.
I’m going to start following the tutorial again. I will choose 2) Set interface IP address.
I’ll configure the LAN, y for Configure IPv4 address LAN interface via DHCP,
n for WAN tracking, n for DHCP6.
My DHCP6 option differs from the tutorial because I don’t want to use IPv6 at all.
Now I keep the remaining defaults.
Currently my LAN IP is 192.168.1.102, which I believe was assigned by OPNsense, as that’s the only logical thing that could have a DHCP server to give out an IP.
I mean, OPNsense’s LAN network currently isn’t connected to anything.
If I was on its LAN, I should be able to access the web interface, but I am not.
This forum post says to make a NAT so that I can access it from the local network I am currently on.
The Port forwarding docs don’t seem to show how to do this from the command line,
so I guess I’ll go connect my computer to spiderverse via Ethernet to make this change.
Port Forwarding the GUI#
August 15
Did some playing around. When I do 2) Set interface IP address, I needed to configure the LAN to not get its address from DHCP.
Instead, give it an IP address of 192.168.1.1 and a subnet count of 24, then I enable DHCP on the LAN.
I have my computer plugged into Ethernet and after making these changes, my computer is given an IP address from the DHCP server!
I now know that the bottom port is port 0, which currently corresponds to vtnet1.
I tried going to 192.168.1.1 in my browser, but it didn’t work. I press enter inside the console and the IP address is back at 192.168.1.102.
Interesting…
Well, I go to that and I see the web interface! Success! I guess?
I login with root/lavenders_password_here and I’m good to go.
Continuing with defaults for everything and I notice “Block RFC1918 Private Networks”.
Let’s disable this, as I currently want to be able to access it on my private network!
I also think that having this disabled might be necessary when this is on the school’s network,
as MyResNet attempts to give you your very own LAN (I say attempts because I’m not convinced that it works half the time).
Eventually it prompts me to set 192.168.1.1 as the LAN network address, which I confirm.
It says it will reload the dashboard when it is done, but it doesn’t and I manually go to 192.168.1.1.
Yay! Now I can finally configure this knowing everything is setup.
Now I have got port forwarding working with this:
Finally, I can configure it on my main LAN network!
Making Proxmox use DHCP#
August 20
Initially, my /etc/network/interfaces has this:
auto vmbr0
iface vmbr0 inet static
        address 192.168.3.220/24
        gateway 192.168.3.1
        bridge-ports eno1
        bridge-stp off
        bridge-fd 0
Now I change it to
auto vmbr0
iface vmbr0 inet dhcp
        bridge-ports eno1
        bridge-stp off
        bridge-fd 0
A restart makes it use DHCP! My router showed the wrong name for my device, which was confusing for a bit, but it worked! When looking at the Network tab of my node, the CIDR shows blank for vmbr0.
Getting Proxmox on OPNsense LAN#
Currently vmbr0 is my WAN port, which is why I wanted my Proxmox host to use DHCP, as it cannot choose what IP it gets.
I’m going to change it to be my LAN port and make vmbr1 my WAN port.
I’ll keep the vmbr0 configuration for DHCP, so my Proxmox host gets an IP from the OPNsense DHCP server.
Then the vmbr1 configuration can stay as manual, because the Proxmox host itself doesn’t need to have an IP on the WAN,
as the only thing that should get an IP through the WAN is OPNsense.
I have made these changes in /etc/network/interfaces on Proxmox, so I’ll now swap WAN and LAN inside of OPNsense before I reboot my Proxmox host.
I reboot, and OPNsense doesn’t come up between I had turned off start on boot for some reason.
I start it via the command line, but I have to manually run dhclient -r vmbr0 && dhclient vmbr0, and now it gets an IP address from OPNsense.
Hopefully I don’t have to worry about that when Proxmox boots up with the VM booted, but we’ll see.
Now I can access Proxmox on its LAN IP.
Connecting OPNsense to MyResNet Network#
I tried putting in the actual MAC address of the Ethernet port but it did not work. When I try and put in the vtnet1 MAC address (found in OPNsense shell), MyResNet tells me that it is a random MAC address , but I am able to add it anyway. Awesome! It has internet access now!
Adding a WiFi Access Point#
Should be as simple as adding a router configured in AP mode to the LAN. Yup. That simple. Everything is working now! Mostly…
Giving Proxmox a Static IP#
I mentioned earlier that I needed to manually run dhclient to have Proxmox get an IP address on the LAN.
This is not ideal, so I’ll just give it a static IP in /etc/network/interfaces.
My final configuration looks like this (vmbr2 is currently unused, along with its corresponding physical port)
auto lo
iface lo inet loopback

iface eno1 inet manual

iface enp2s0f0 inet manual

iface enp2s0f1 inet manual

auto vmbr0
iface vmbr0 inet static
  address 192.168.4.20/24
  gateway 192.168.4.1
  bridge-ports eno1
  bridge-stp off
  bridge-fd 0
#LAN port

auto vmbr1
iface vmbr1 inet manual
  bridge-ports enp2s0f0
  bridge-stp off
  bridge-fd 0
#PCIe slot 0 Ethernet 0 - WAN port

auto vmbr2
iface vmbr2 inet manual
  bridge-ports enp2s0f1
  bridge-stp off
  bridge-fd 0
#PCIe slot 0 Ethernet 1
Configuring DNS Servers#
To configure DNS servers, I go to Services > DHCPv4 > [LAN] > DNS Servers. I now set it to be the IP address of my AdGuard Home container that I just setup.
Routing All DNS Traffic to AdGuard Home#
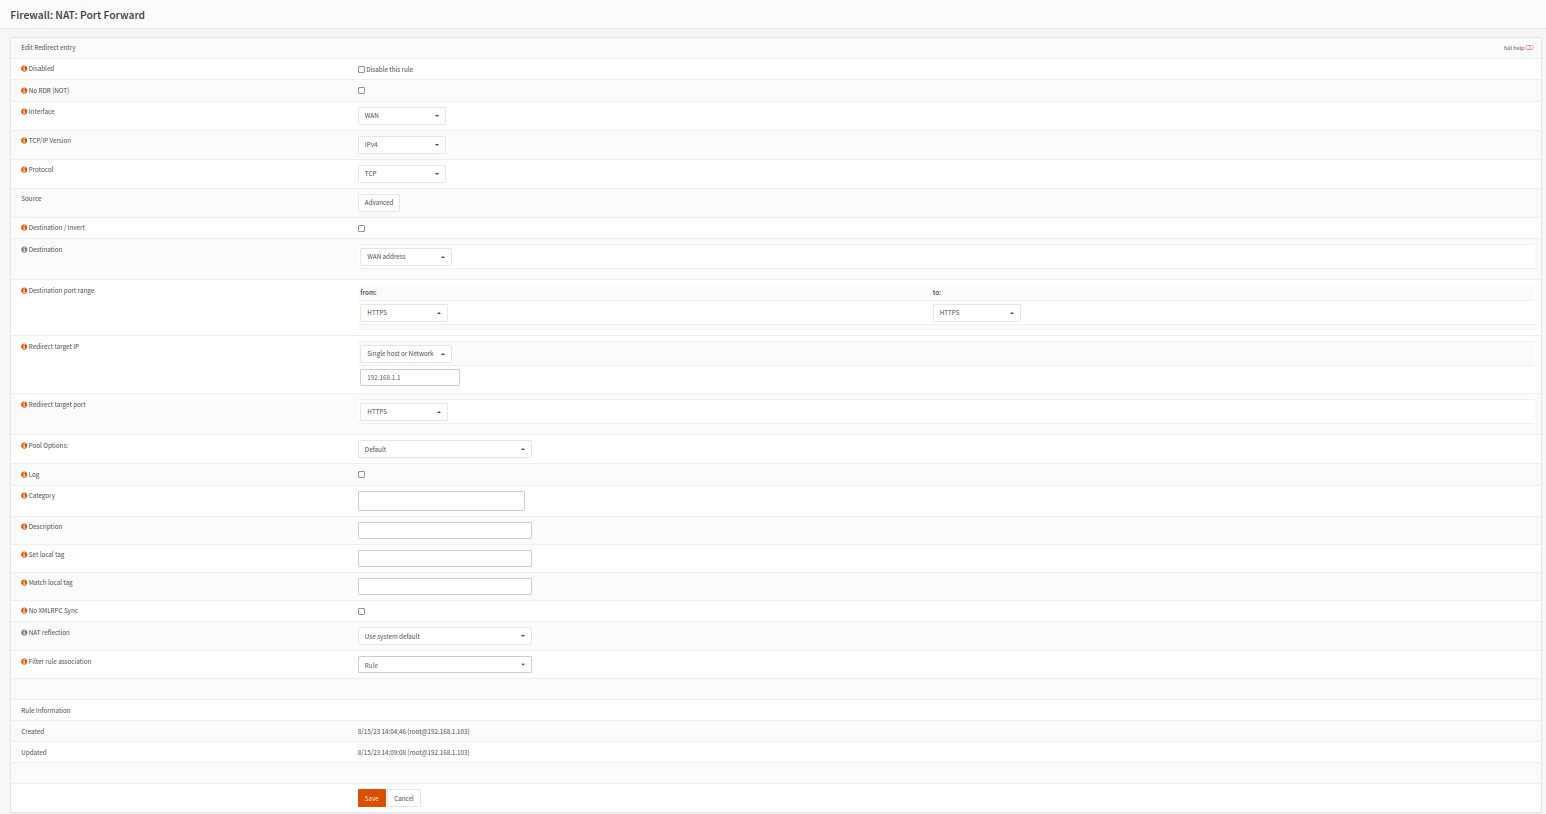
I go to Firewall > NAT > Port Forward, add a rule. I follow this to add the rule: https://forum.opnsense.org/index.php?topic=9245.0
Interface |
LAN |
Protocol |
TCP/UDP |
Destination / Invert |
Checked |
Destination |
LAN address |
Destination Port |
DNS |
Redirect target IP |
192.168.3.40 |
Redirect target port |
DNS |
NAT reflection |
Disable |
Apply the changes, and it works! I use this to make sure it’s working: https://www.top10vpn.com/tools/what-is-my-dns-server/. Then I set my computer’s DNS server to be something different and when I run the test, it will route it through AdGuard Home!
Routing Through WireGuard (I can’t figure it out)#
I want to route all 192.168.3.X traffic to my home network. I don’t need to route 192.168.4.X traffic on my home network here, but if I ever do want to set that up, I’d imagine I would want to use OPNsense to be my home router. For now I’ll just focus on routing traffic to home.
First I need to install WireGuard plugin in System > Firmware > Plugins.
It tells me I need to update. I update OPNsense and let it reboot. Now I install os-wireguard.
I reload the page after it installs, and can now navigate to VPN > WireGuard.
I start adding a new configuration under the Endpoint tab.
Now I need to add a new client on my WireGuard server.
I use pivpn add to create the client.
For the Endpoint, public key in the conf file is the public key, preshared key in the conf file is the shared secret.
The allowed IPs becomes 10.6.0.4/24, 192.168.3.0/24.
Now create an instance under the local tab.
Public key and private keys are copied over from the conf file.
There was some duplication with the public keys, so maybe one of them didn’t matter, but I’m keeping it this way because it’s working.
The status tab shows the connection is successful, but requests to that subnet do not go through.
I will now follow this: https://docs.opnsense.org/manual/how-tos/wireguard-client.html#step-5-assignments-and-routing
and complete steps A and B. I also set the Tunnel Address (inside the local tab) to 10.6.0.4/24.
Now I can ping my network from the OPNsense shell! However, only 10.6.0.0/24 traffic is being routed for my computer on the LAN.
Alright, so that didn’t work to route traffic through the right subnet, so now I’m following: https://docs.opnsense.org/manual/how-tos/wireguard-selective-routing.html
We did already make some good progress, though.
Alright I’m giving this video a try: https://www.youtube.com/watch?v=ah0Kkkqqfcg I am ignoring the “HQ” or server configuration, but I am doing pretty much everything recommended for the client OPNsense WireGuard. I create a rule (Firewall > Rules > WireGuard (Group)) to allow everything in and out. And… I can’t seem to get it working.
Well, this is a task for another day. I do have a different setup than all the tutorials. I’m not running OPNsense on the server side, so maybe I’ll try that at some point.